When you're adding content to a rich text element, you might want to format your text and add structure to your content. Use the options available in the inline toolbar.
Meet the toolbar
You can easily structure your content using headings, paragraphs, ordered or unordered nested lists, tables, links, images, components, and other items and add formatting such as bold, italics, subscript, superscript, and monospace.
Use character counter
If you need to write content of a specific length, there’s a character count located at the bottom of the editor window to help you.The counter can also show the number of words and whether you're approaching a specified limit. To enable word count, adjust the limitations of the rich text element.
Adding links
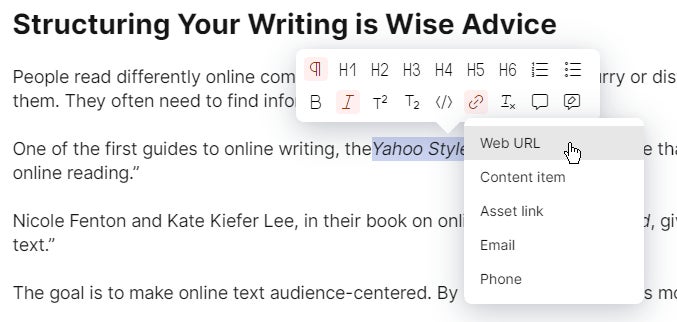
Add hyperlinks to your content by selecting a portion of the text in the rich text editor and clicking the button.You can select which type of link to insert:
Web URL link– creates a hyperlink to a website (such as https://example.org). You can insert any type of URL, including absolute and relative addresses, and anchors. You can also specify a link title and choose whether the link should open in a new browser window.
Asset link – points to any asset within your project and lets visitors view and download the file.
Email link – creates an email hyperlink (such as mailto://email@address.com). Clicking on a mailto link opens a new blank email in the visitor's default email client. You can define the recipient and subject of the email.
Phone link – creates a phone link (such as tel:+420630123456). Clicking on a tel link opens the visitor's default phone client with the number ready to be called.
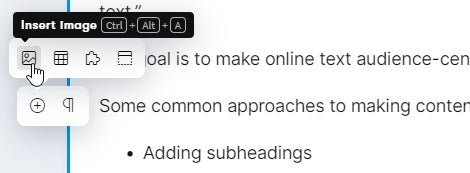
Adding images
Make your content more engaging. Add images directly to the rich text by clicking and then . The image will be inserted at the position of the cursor.When selecting the image, you can either choose an image from your existing assets or upload a new one.
Adding tables
To add a table, position your cursor in the text and click and then .By default, the table will be 3 x 3 – consisting of 3 rows and 3 columns. You can change the table's dimensions by right-clicking the table and choosing one of the options shown.If your tabular data is larger and more complex, model it in Kontent.ai using components in rich text. This approach allows you to reuse your data and display it in your app however you want.
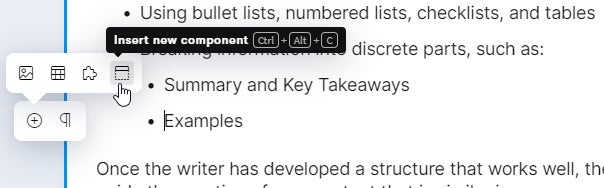
Adding components
Depending on whether you'd like to reuse your content later or not, you can either choose a component (for one-time use) or a content item (reusable). Both of them can be added directly to a rich text element via the toolbar.Clickand then to add a new component to the element. Choose a content type you want the component to be based on.The component will be added to the text at the position of the cursor. To change the position of the inserted component within the rich text element, drag & drop the component as needed.You can now start filling in the content. You can set limitations on the content type of the components that can be included in the rich text.
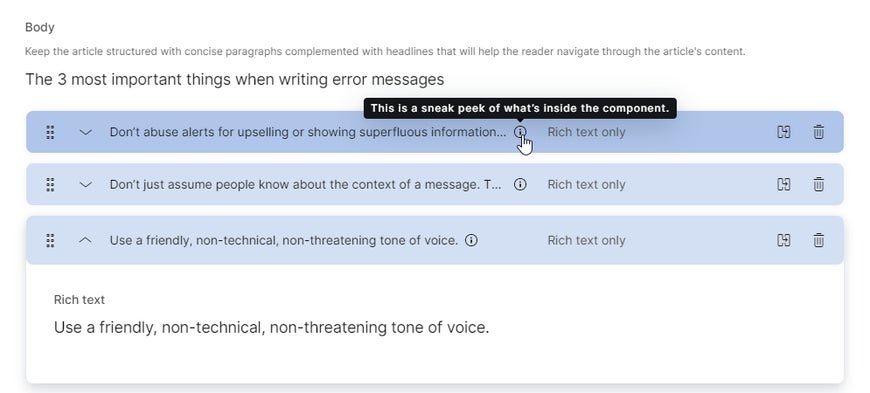
Save space by collapsing components
You can quickly collapse all the components in the rich text by clicking More actions and then Collapse components.Even with the collapsed components, you can still see a little text preview of what's inside. For this to work, your component needs to contain a filled-in text element.
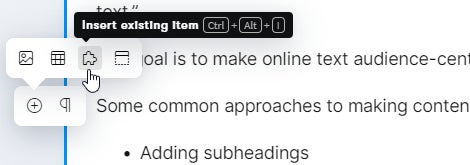
Adding content items
Click and then to embed a content item into your text. The content item will be inserted into the text at the position of the cursor. To change the position of the content item within the rich text element, drag & drop the item as needed.Identically as with linked items elements, a tile representing the included content item will appear showing its name, content type, workflow status, and readiness. You can set limitations on the content type of the content items that can be included in the rich text. After adding linked items, you can publish all the linked items along with the original content item to save you the time of publishing each item separately.You can expand the item you added to see its content. Click to open and edit the item.
Clear formatting
Clear formatting by selecting a portion of the text in the rich text editor and clicking the button. All formatting for the currently selected text will be removed, including lists, tables, and links.Components, linked items, and assets included in the selected area will be ignored and their formatting preserved.
Not enough options in the toolbar?
Maybe you're used to editors where you can set your text color, font face, or image display width. And maybe you're missing these options in Kontent.ai's rich text editor. The editors that offer tight control over visuals of content are called WYSIWYG (What You See Is What You Get) and there's a reason why Kontent.ai doesn't offer these options out of the box.While this level of control over visual aspects of your content might sound useful, there's a catch. When you use WYSIWYG editors to style your content, you face the danger of creating visually inconsistent content, violating your organization's visual style guide, or even breaking your app. Also, it's usually next to impossible to reuse content from WYSIWYG editors across multiple channels. Why, do you ask? Have a look at our blog post about the pitfalls of WYSIWYG editors.
Not sure yet how to work with content items?That's quite all right, we have e-learning for that. Take our Content creation: First steps e-learning path and find out how to tackle composition in the rich text editor, add structure to your content, and discover collaboration options you have in Kontent.ai.
You can use any text formatting inside your tables and insert images into them. However, tables won't let you create nested tables or insert content items and components.