Set up workflows to keep track of your content production progress and support collaboration. You can create separate workflows for different content types and collections. For example, marketing and legal content can have different workflow steps, transitions, and role permissions.
Create a workflow
Adding new workflows requires Multiple workflows enabled for your subscription.
In Environment settings > Workflows, click Create new.
In Workflow name, type a clear descriptive name of the new workflow.
If you select Any content type, the workflow can be used for any type that isn’t limited to other workflows.
If you select Any collection, the workflow can be used for any collection that isn’t limited to other workflows.
In case of a conflict between generic and specific rules, the most specific one is always used.
In case of multiple conflicting rules that are similarly specific, all those rules are used.
Add workflow steps
In Environment settings, select Workflows.
Next to a workflow step, click .
Configure the step as you desire.
Click Confirm.
Click Save changes at the top right.
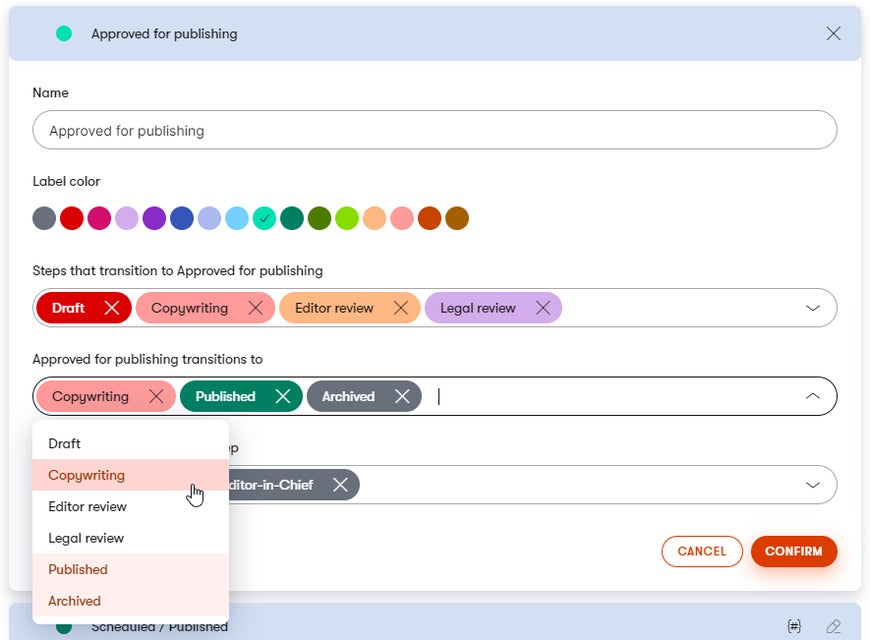
Change workflow transitions
When configuring transitions for a workflow step, make sure the step can eventually transition to the final Published step.To change the transitions of a workflow step, click the step name and select transitions to and from the step. Then confirm and save your changes to the workflow.
Limit workflow steps to roles
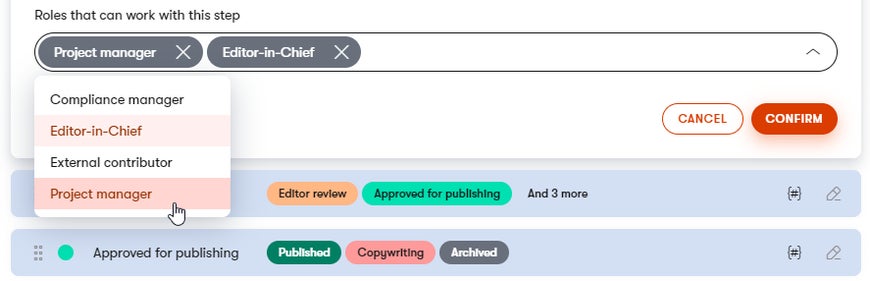
You can limit which roles can work on content in each workflow step. This includes the ability to move content items to the next workflow step. By limiting steps to roles, you can set up a complex workflow where, for example, only the editor and the legal team can move content items to the Approved step and then publish them.By default, the predefined workflow steps (Draft, Published, and Archived) are limited to the Project Manager role but you can always change that.To limit a workflow step to specific roles, click the step name, and select one or more roles from the list. Then confirm and save your changes to the workflow.When changing the workflow step of an item, you always need to assign at least one contributor whose role allows them to work with the new workflow step.
Delete workflow steps
There must always be at least one other step for editing content. By default, workflows come with the Draft step for this purpose.If you want to stop using a workflow step, you can delete it when no content item is in that step.
In Environment settings, select Workflows.
Open for editing the workflow in which the step is.
Click the workflow step.
Click Delete.
Click Save changes at the top right.
After deleting a workflow step, make sure that content items can still reach the final Published step.The following workflow steps are always present and cannot be removed:
Discover various approaches to and the best practices behind workflow design.
No limitations in the default workflowThe default workflow cannot be limited to specific content types or collections. This ensures that every content item has at least one workflow available.You can use the default workflow only for content items based on the content types and assigned to the collections that aren't specified in any workflows. The same logic applies to workflows without limitations.
Multiple workflows and restrictions on the first workflow stepIf you have multiple workflows enabled in your project, role restrictions on the first workflow step work a bit differently.When a user creates a content item in a workflow where they can't work with the first step, the item gets created in the first step anyway but the user can't work with the item because of their role permissions.In case you don't have multiple workflows enabled, users whose role can't work with the first workflow step create content items in the first step they can work with.
Control who can create new versions and unpublishChoose which roles can create new versions of content and which roles can unpublish. To do this, edit the Scheduled / Published step and select roles for each action.